zondag 10 september 2017
Horticultural magic
Labels:
horticultural therapy,
inspiration,
zen
How to make a moss terrarium (Stormthecastle)
How to make A Moss Terrarium
part 1.
http://www.stormthecastle.com/terrarium/a-moss-terrarium.htm
Moss terrariums have become very popular lately and I thought it might be a nice idea if I did a little bit of experimenting with my own. Now, I don't really know a lot about moss but I figured it's a nice time to learn.
So what I did was went for a walk in the
local cemetaries, wooded areas and parks looking for moss. It's kind of
ironic because when I got home I noticed I had a fair amount of moss
right in my own yard. I didn't even realize it. Anyhoo, here is some
tips and information that I gleaned during my walk and I will keep you
posted as to the status of my moss terrariums.
An initial thought on Moss Terrariums
To me it seems to be a bit plain to have a
terrarium with just moss in it. But we will see how it goes. I do think
that moss would be an absolutely outstanding addition to a regular
terrarium so whatever I learn will be put to good use.
I have also completed a second moss terrarium tutorial that is a little more complex and more attractive. It is located here: How to make a moss terrarium part 2
Special Note and Caution
about using any kind of external plant, rock or wood piece in your
terrariums: Moss, Rocks, Plants, Wood pieces from the outside world can
carry insects with them. Or even insect eggs that you can't see. You
should not immediately add these outside things to any indoor plant or
terrarium. You should first quarantine them in a sealed transparent
container for up to a month. This way you can see if anything develops
or any eggs hatch. In the case of the moss terrarium in this tutorial
its rather harmless because there is just the moss and it is a sealed
container. A reader, who has a bearded dragon, collects rocks and wood
from outside then bakes it in the oven at 350 degree for an hour to kill
all bugs and diseases. So his bearded dragon doesn't get sick.
Hunting For Moss
I took a backpack, some plastic bags and a few digging tools with me on my hunt. If you are going to be hunting around for moss I have some suggestions for you.
First off you should really get a feel
for the environment that the moss grows in. Notice where it seems to
thrive and why? You want to try to replicate this environment in your
terrarium. I noticed that moss in my area seemed to like a few things:
- Shady Spots - the moss in sunny areas was often brown and unhealthy
- Angled and slanted areas (they seemed to grow well on the sides of small hills) I am not sure if this is because they prefer it or because competing plants don't like the sides of hills.
- This could be a water preference. On a slanted location the moss will get water only for a short period of time which is rather interesting. And this leads me to believe the moss will do well with frequent but very light waterings. I got an email from a terrarium fan who recommended misting moss terrariums twice a day. This is a bit more work than I want to do but it may be necessary
This picture shows moss growing through the cracks of a slanted wall. It appears to be pretty healthy.
And this picture shows moss thriving in the shade of a tree. Again the soil has a slant to it.
I found some healthy and bright green
moss hugging up against the roots of a tree so I dug it up and this is
what I am using in my terrarium. I made sure I got a liberal amount of
soil under the moss.
Making the First Moss Terrarium
This illustration shows how I have made this first terrarium.
I put a layer of potting sand on the bottom for drainage. Then I put a thin layer of spanish moss to keep the soil in place.
Then I put about half my intended soil
in. And I placed a few thin slices of slate in there. I angled them.
Then I filled in the rest of the soil. Finally I placed the moss right
on top of the whole thing.
Because it seemed to me that moss likes
angles I figured I would build an angle right into the terrarium. We
will see how it goes! In the beginning I will mist it every day but
hopefully I will be able to taper down on this and not do it so often. I
am also going to make a couple more terrariums with just moss. One of
them will have the moss in a flat position so I can monitor how well it
does.
About sunlight - This is a bit of a
concern for me and I am going to limit the amount of sunlight these
terrariums get. Seems to me they don't thrive too well in it but with
daily mistings they might thrive in more sunlight - I will let you know.
A Note from Will: If you
are looking for living moss to make a terrarium or to add to your
bonsai this is the perfect stuff. Living Terrarium Moss for Bonsai and
terrarium making. Hirts Gardens now sells The perfect moss and it is
available on Amazon.com I have ordered two of these and will fill you in
on how they are.
Looking for a little green gift to
keep that someone fascinated? Look at this one! Le Petit Singularite is a
small, well-made, cork-topped jar, made from 40% post-consumer recycled
glass. Its design is simple and it looks good everywhere (we've checked
around our homes). Kit comes attractively packaged and with one figure -
please specify male or female.
Will has bought this exact terrarium
moss product and he loves it. It comes nice and misty in plastic bags.
There is a nice variety of interesting moss.
Terrarium Moss Kit
Will has bought this exact moss kit too!
Pictures of more moss Terrariums!
Moss terrariums are wonderful in their
simplicity and beauty. And you can often make one without spending a
penny. Just collect up the moss from the outdoors. Add some small
accents and they become a beautiful little world. I have some pictures
here:Moss terrariums.
---------------------------------------------------------------------------------------------------------
part 2.
How to Make a Moss Terrarium Part 2
Thiis a tutorial on how to make an attractive moss terrarium easily. And in this tutorial I add some extras and give you more advice on building it and caring for it. I also add a small figure to this terrarium and a pair of very small flowers (micro miniature Sinningia).
This tutorial is the second in my series of
tutorials about moss terrariums. You can see the first tutorial in this
series here: Make an easy moss terrarium.
|
The Suggested Materials Needed
I suggest a few things for this terrarium
project. First off you should use a container that has a large mouth
opening. On the right you can see the fish bowl that I am going to use
to make this terrarium. This is so you can easily get your hand in and
out and so you can easily get the moss in. I show you a few different
containers. The small mouth containers are not suitable for this kind of
project.
After that you need a cup full of pebbles, a
couple of cups of potting soil, your moss, and a spray bottle. The
spray bottle is so you can mist the moss afterwards. Moss likes to be
misted and you should do this once or twice a day.
What to do:
- Put about an inch layer of pebbles in the bottom of the container
- Put about 2-3 inches of soil right on top of the pebbles. This is optional because moss can do very well without much soil at all.
- Arrange your moss in the container and press it down nice and tight
- Add any accessories and accents you want (I added the little ranger figure and two small flowers.)
Caring for the terrarium:
If you have a container with a cover or a
lid then you can cover it but monitor it closely for moisture. You may
need to regularly or daily remove the cover and spray mist the moss. My
recommendation is that you leave it uncovered for a couple of weeks so
you can mist and water it and monitor it before closing it up.
The Video tutorial
Will has bought this exact terrarium moss
product and he loves it. It comes nice and misty in plastic bags. There
is a nice variety of interesting moss.
Will has bought this exact moss kit too!
The Magician
Labels:
glass jarr terrarium,
home grown,
terrarium
zaterdag 26 augustus 2017
pennisetum alopeuroides
Lampenpoetsersgras
Latijnse naam: Pennisetum alopecuroides
Plantensoort : gras
Gebruik : groep (voorzie 6-9 planten/m2),kleine groep,solitair
Habitat : open plaatsen met droge, frisse bodem
Hoogte : 50 - 100 cm
Bloemkleur : bruinpaars
Bloeiperiode : aug - okt
Bloemen : groene tot paarse aartjes in ronde pluimen
Bladkleur : donkergroen
Wintergroen : nee
Pennisetum is een sieraad voor uw tuin. Dit heeft hij te danken aan de platte bladschijven en bovenal de langwerpig ronde, pluimvormige bloei. De sierlijk overhangende aren zijn hét kenmerk van lampenpoetsergras. De pluim werd vroeger wel als rager voor de cilindervormige glazen kap van de olielamp gebruikt. Daar heeft het zijn naam dan ook aan te danken. Tegenwoordig zien we de pluimen ook steeds vaker terug in droogboeketten. Lampenpoetsergras komt van nature voor in tropische, subtropische en gematigde streken en bestaat uit meer dan tachtig soorten en daarbinnen bestaan weer vele variëteiten (cultivars).
De belangrijkste soort van lampenpoetsersgras is Pennisetum alopecuroides. Deze grassoort heeft prachtige namen gekregen die hij dankt aan de opvallende aren die in de herfst boven de plant uitsteken. De Nederlandse naam lampenpoetsergras spreekt tot de verbeelding, maar ook de Latijnse soortnaam Pennisetum alopecuroides duidt op de aren. Pennisetum komt van de woorden penna en seta, die respectievelijk veer en stoppel betekenen. Alopecuroides betekent letterlijk ‘lijkend op een vossenstaart’. Door de verkleuring van het blad in de herfst en de mooie compacte vorm voor de bloei, heeft u het gehele jaar een plant waar u met plezier naar kijkt. Op zijn mooist is hij na een warme zomer. Lampenpoetsergras kan worden geplant in een pot, in grote aantallen bij elkaar, in een border of als alleenstaande plant.
Algemeen onderhoud
Lampenpoetsergras is niet helemaal winterhard en kan daarom het best op een zonnige beschutte plek staan. Het verlangt een licht humeuze grond of grond, die goed water doorlatend is en permanent licht vochtig blijft. Deze grassoort groeit uitstekend op een plaats in de zon tot halfschaduw. Het kan als eenling (solitair) worden gebruikt, maar veel meer komt het tot zijn recht in een grote groep. Knip het blad pas af na de winter, wanneer het nieuwe gras zich begint te ontwikkelen. Anders kijk je de hele winter tegen een miezerig stompje met afgeknipte stengels aan in plaats van een mooie volle bos met bruin gekleurd gras. Breng in het najaar een mulchlaag aan. Omdat lampenpoetsergras niet honderd procent winterhard is, helpt deze laag tegen het bevriezen van de wortels. Daarnaast zorgt de mulchlaag ervoor dat onkruid minder snel tot ontwikkeling kan komen. Je hoeft daardoor in het voorjaar minder te wieden. Bij langdurige droogte kun je het beste deze plant extra water geven, anders kleuren de bladeren al erg vroeg bruin.
Bijzonderheden : Geen bijzonderheden
Bij hete zomers begieten.
Afknippen in het voorjaar. : Maart tot April.
Eigenschappen
- Hoogte50 - 100 cm
- Kleur
- Winterhard Ja
- PH Neutraal
- Vochtigheid normaal
- Licht
- Zon
- halfschaduw
- Schaduw
- Evergreen
- Bladhoudend
dinsdag 15 augustus 2017
Fargesia Rufa Bamboo
Photo copyright: Noah Bell, Bamboo Garden Close up of large Fargesia sp. 'Rufa' Note that F. robusta, F. sp. Scabrida, and F. sp. Rufa all have similar culm sheaths and culms. We believe they are closely related. |
Fargesia sp.
'Rufa'
Maximum Height: 10' (avg. 7'), Cane Diameter: ½"aka Fargesia dracocephala 'Rufa' Hardiness: -15º F USDA zone 5 through 9, not for climates with high heat and humidity (southeastern states). A beautiful and very hardy Fargesia with new culms that have attractive rusty reddish sheaths and a clumping root system. This new introduction is proving to be one of the most hardy and versatile clumping bamboo in the landscape. It is a shorter Fargesia, only about 10 feet tall when mature, but a vigorous grower, sending up many new culms each season. The new culms leaf out early in the summer, making it an excellent choice where its rapid growth is desired. Like Fargesia dracocephala and Fargesia robusta, its leaves do not curl in the sun, but it is hardier than either of these. Yet like all Fargesias, it should be planted with protection from the hot afternoon sun, especially in warmer climates. We have customers who have grown very successful evergreen screens, using Fargesia sp. Rufa in places such as Michigan, New York, Massachusetts, New Jersey, Tennessee, Missouri, Idaho, South Carolina, and many other states. It has proved to be the most versatile, hardy clumping bamboo in our selection. Unfortunately it cannot handle the high heat and humidity of the southern gulf states. If you need a clumping hedge that gets 8 to 10 feet tall, with a beautiful, evergreen leaf texture, Rufa will not disappoint, just remember, afternoon shade is preferred. Recently suggested by Chris Stapleton to be the original "Dragon's Head Bamboo" (Fargesia dracocephala) described by Chinese botanists. also see Fargesia sp. Rufa Green Panda |
Photo copyright: Noah Bell, 2009 ~A screen of F. sp. 'Rufa' at Bamboo Garden, about 9 feet tall |
|
Close up showing rusty red culm sheaths. |
Photo copyright: Ned Jaquith, Bamboo Garden A nice Fargesia sp. Rufa growing along a water canal in Holland. Click on link to see larger picture |
Photo copyright Noah Bell, Bamboo Garden, 2012 A large order of Fargesia sp. Rufa in the # 1 size, scheduled to be shipped out on a windy spring day. |
|
photo copyright: Noah Bell, Bamboo Garden Our one gallon crop of Fargesia rufa: 4-6 canes, 2-3 feet tall A customer admires her Fargesia rufa. It was planted from a two gallon size and has grown over five feet tall after only a year and a half. | |
zaterdag 15 april 2017
Cactus soil
How to make cactus soil
Read more at Gardening Know How: Cactus Potting Soil – Proper Planting Mix For Cacti Plants Indoors https://www.gardeningknowhow.com/ornamental/cacti-succulents/scgen/cactus-potting-soil.htm
mix 1:
he plants are fine with one part washed sand, one part soil and one part gritty amendment such as pebbles or even pot shards
mix 2:
five parts potting soil, two parts pumice and one part coir for a mixture that dries out evenly.
http://www.cactiguide.com/article/?article=article8.php
Introduction
Now that we've ruled out pre-made mixes as a stand alone solution for our cactus soil, lets look at one method of making a custom mix. To start with, you will want a container large enough to hold all of your ingredients with enough room to stir them together without spilling. I prefer to use plastic storage tubs (see far bottom left picture), but a wheel burrow could also work. You will also want some sort of measuring device for consistency. This does not have to be precise, I use a 5 quart plastic ice cream container. You can "eyeball" the amounts as well, but you will likely end up with inconsistent proportions from batch to batch so I don't recommend that. A trowel or small shovel will also be useful for mixing it all together.
Desert Mix
Soil:
I will include one 5 quart bucket of this (or one part, depending on the amount I'm mixing).
Pumice
Next, I will include 2 buckets (or 2 parts) of pumice.
Pumice is a relatively light weight volcanic rock that is porous. Pumice is not available in many areas and while light, it is still too heavy to mail order with shipping costs. Substitutes include pearlite, non-soluble cat litter, aquatic plant soil or Turface, NAPA oil dry #8822, chicken grit, or another similar substance. The goal is to provide an inorganic substance that allows water to pass through the mix quickly, while at the same time making the mix somewhat "airy".
Coir
The third ingredient that I use is coir. Most people have never heard of coir and it is not a product that is easy to find, even though it isn't that rare. Coir is made of shredded coconut husks and is a coarse, fibrous material that is technically organic, but it is very slow to decompose. The purpose of adding coir to the cactus mix is to help hold moisture and air while providing structure to the mix. Unlike peat, coir can easily be re-wet after it dries out and it does not compact.
If you cannot find coir, peat can be used as a substitute, but you may consider using less of it. And since many potting soils have a high percentage of peat, you might just skip adding peat altogether - perhaps 60% pummice/grit/litter to 40% potting soil.
I use 1 bucket (or 1 part) of coir in my mix. Coir is sold in very tightly compressed bales. Before using it in your mix, it has to be loosened up. This is hard work and while it can be done by hand, I found the best method to be a wire mesh screen mounted on a wooden frame. I then break chunks off the bale and rub them on the screen. When this is done, the coir expands to at least 3 times its original volume in the bale.
Mix for epiphytic cacti (epis):
I do it much the same way, but instead of 2 buckets (2 parts) of pumice, I will add only 1.
Next, I will add 2 buckets (2 parts) of coarse "orchid bark". This is ground up redwood bark pieces that are marketed for use by orchid growers. The bark holds more water than the pumice, which the epi cacti like. I notice that the roots also like to attach to the bark pieces. The bark also keeps the mix more airy than simply adding more potting soil. Over time, the bark will break down and turn into soil. I find that the epi cacti don't mind this at all, but will eventually appreciate a repotting. I would say it is best to repot every 2 to 4 years depending on your specific conditions.
Addition to desert mix and the epi mix:
I add a time-release fertilizer. The best known brand of this is Osmocote® and that is the kind I have always used, although I am sure similar products would work fine. I usually put about 3/4 of an inch in the bottom of the 5 quart ice cream pail and then dump it in.
You'll have to figure out how much that is if you are using a different measurement or just follow the recommendations on the label. Since this is a time-released fertilizer, a newly potted plant will be fine for 6 months to a year, depending on how much you water it. The epi cacti will obviously be on the short end of that. You will not likely be ready to repot at this time, so you will want to remember to apply a fertilizer after this time.
Bone meal
Aside from this fertilizer, I've also picked up the habit of throwing in a scoop (1 trowel full) of bone meal. Admittedly, I'm not really sure of the effects on the cactus by adding this, I just got the idea from another grower. His plants grow very well and it seems to be working well for me so far.
Mix it all up
Once I have all the ingredients in my tub, I mix them with the garden trowel. If it is a larger batch, I use a small spade. In the left picture below you can see the various ingredients ready to be mixed for an epi cactus mix. This gives you some idea of the proportions used - keeping in mind that there is overlap in that tub.
The second picture shows the final result of a desert cactus mix. Note the absence of any bark pieces. The little yellow dots are the fertilizer. Finally, it might seem in that mix that there is a 50:50 mix of soil to pumice, but remember 25% of the soil mix is coir. It seems to lose its reddish brown color when all mixed in.
epi cactus mix desert cactus mix
In conclusion
I reiterate that this mix is not the magic recipe that all growers should follow exactly. I even vary this mix with certain cacti species that might prefer even less organic material. Keep in mind also that there are many other factors such as, light, humidity, and temperature that affect the growth of your cactus plants. These all should be considered along with availability of materials when you set about creating your own mix. Don't be afraid to experiment as that is half the fun! It is my hope that this article will provide the reader with a "better feel" for mixing up a custom batch of cactus soil.
Author: Daiv Freeman
zaterdag 18 maart 2017
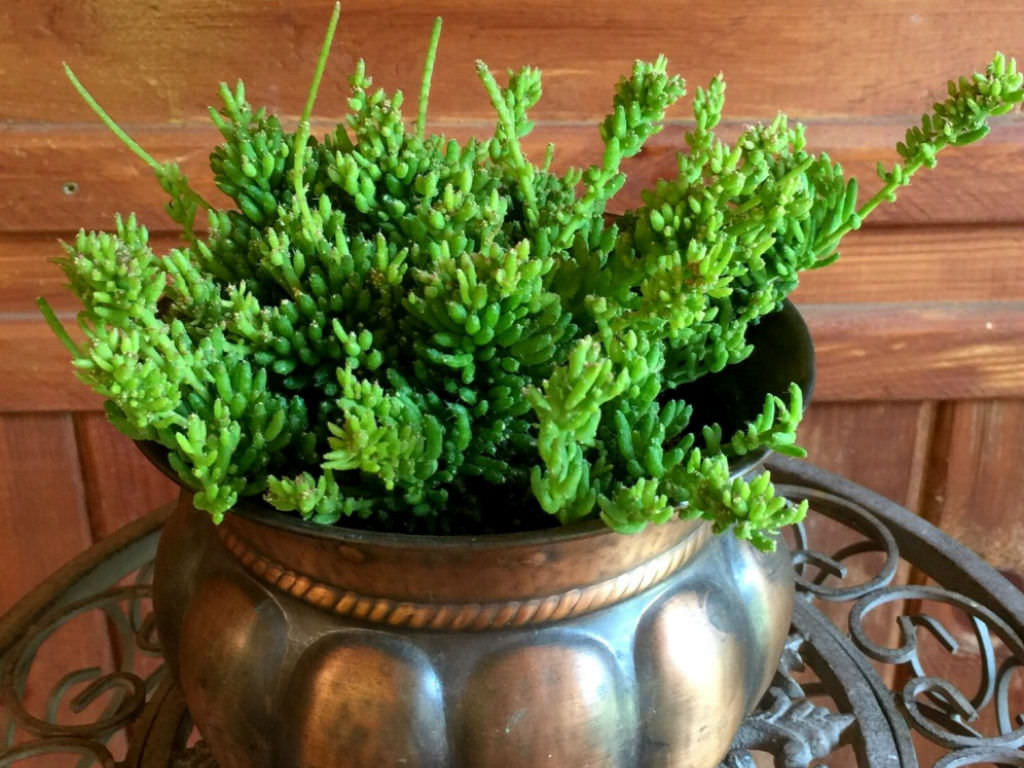
Rhipsalis mesembryanthemoides
Scientific Name
Rhipsalis mesembryanthemoides Haw.
Common Names
Clumpy Mistletoe Cactus, koraalcactus, biescactus
Scientific Classification
Description
Rhipsalis mesembryanthemoides is an epiphytic cactus with strong stems covered by tiny branchlets. Initially this plant grows erect, later it is pendent. The main branches are elongated, cylindrical and woody, up to 20 inches (50 cm) long and up to 0.08 inch (2 mm) in diameter. The white flowers appear at areoles of the branchlets. They are up to 0.3 inch (8 mm) long and up to 0.6 inch (5 mm) in diameter. The short-oblong fruits are white, up to 0.2 inch (5 mm) long.
How to Grow and Care
Rhipsalis does not thrive in direct sunlight. Exposure to afternoon sun can burn the leaves, turn them yellow, or lead to spotting. However, without sufficient sunlight, They will not bloom, and its growth can be stunted. Rhipsalis does best with morning sun and full shade in the afternoon.
As Rhipsalis is commonly grown indoors, care must be given to the placement of the plants. They should be kept at least 20 inches (50 cm) away from windows that receive midday or afternoon sun. The glass in the windows can multiply the heat from the sun’s rays, causing sunburned leaves. Keep in mind that in its native environment, Rhipsalis is accustomed to receiving light that has been filtered through dense, overhanging tree branches. Picturing this environment can help you adjust your lighting accordingly… – See more at: How to Grow and Care for Rhipsalis.
Origin
It is widespread in the Brazilian state of Rio de Janeiro, on both sides of the Baja de Guanabara, at an altitude below 600 metres (2,000 ft) above sea level.
How to Grow and Care for Rhipsalis 0
By WoS on January 18, 2016
Cultivation, General Care
Rhipsalis is a cacti genus with approximately 35 distinct species. One of the most popular varieties is Rhipsalis baccifera, also known as Mistletoe Cactus. This should not be confused with the plant commonly called Christmas Cactus; although they are cousins, they are very different plants and are not classified in the same genus. While many people think of the prickly plants that are native to the American deserts when they hear the name “cactus“, most Rhipsalis have no needles, and they would not survive the dry soil and bright sun of a desert. Virtually all species are native to the rainforests of South America, the Caribbean, and Central America, leading to their classification as jungle cacti. The difference between the native environments of jungle and desert cacti means that caring for Rhipsalis requires overcoming any pre-conceived notions you might have about what cacti prefer.
Lighting Requirements
Rhipsalis does not thrive in direct sunlight. Exposure to afternoon sun can burn the leaves, turn them yellow, or lead to spotting. However, without sufficient sunlight, They will not bloom, and its growth can be stunted. Rhipsalis does best with morning sun and full shade in the afternoon. As Rhipsalis is commonly grown indoors, care must be given to the placement of the plants. They should be kept at least 20 inches (50 cm) away from windows that receive midday or afternoon sun. The glass in the windows can multiply the heat from the sun’s rays, causing sunburned leaves. Keep in mind that in its native environment, Rhipsalis is accustomed to receiving light that has been filtered through dense, overhanging tree branches. Picturing this environment can help you adjust your lighting accordingly. Rhipsalis Photo via archiwum.allegro.pl
Watering
Rhipsalis is not a drought-resistant plant, so regular watering is essential. Over-watering, however, can cause weak stems and rotted roots. Using a watering can may help you measure the amount of water you are providing. The size of the pot compared to the size of the plant, the humidity levels in the home, and the type of potting soil used can all affect the watering frequency. Rhipsalis seldom needs to be watered more than once a week. Check before watering by pressing your finger into the soil to a depth of half an inch. Postpone watering if the soil is moist. You can also use a moisture meter to help you determine whether it is time to water.
Selecting Pots
Rhipsalis does best when planted in clay pots. The advantage of clay pots is that they allow the soil to “breathe” better than other types, helping to dissipate moisture that could rot the plant’s roots. Most varieties of They produce long, hanging leaves that make them ideal hanging plants, so when selecting pots, many people choose styles that can be placed in a metal or macramé plant hanger. Soil Novices to the world of jungle cacti might prefer purchasing a potting soil made specifically for cacti. Gardeners with experience growing succulents can make their own by combining regular potting soil with sphagnum, coir, orchid bark, or gravel to ensure proper drainage. Most types of Rhipsalis will need to be transplanted every two or three years using fresh potting soil. When repotting, take care not to damage the roots.
Fertilizing
Do not feed newly repotted or just-purchased Rhipsalis for 12 months. Rhipsalis does not need feeding until the soil begins to become depleted of nutrients. If feeding is desired, use a diluted, half-strength fertilizer formulated for cacti. Feed monthly only during spring and summer months. Follow the directions provided with the fertilizer to determine the correct quantity, which will be based on plant size, pot size, and other factors.
Abonneren op:
Posts (Atom)